
If your PC restarts or shuts down while gaming, it does not automatically mean your power supply is dying. First determine whether Windows crashed, the PC lost power, or only the display failed. The shutdown pattern, Windows records, and controlled tests can narrow the cause, but some failures can only be confirmed with a known-good replacement component or professional testing.
This guide is primarily for Windows desktop gaming PCs that work normally during light use but restart or switch off when a game loads or the hardware comes under pressure. Laptop owners can still use the Windows records, stock-settings, and temperature sections, but should not disassemble the machine or attempt internal power repairs unless qualified to do so. The goal is to gather useful evidence before replacing a perfectly good PSU, GPU, RAM kit, or motherboard.
Before testing: Back up important files. Stop immediately if you smell burning or see smoke, sparking, or melted connectors. You should also stop if the PC repeatedly loses power. Shut down and disconnect the PC from mains power before inspecting internal cables. Never open a power supply.
Identify What Actually Happened
“My PC crashed” is not specific enough to diagnose. A game closing, a Windows stop error, an instant restart, and a complete loss of power may look similar in the moment, but they point down different troubleshooting paths.
| What happens | What it suggests | First evidence to check |
|---|---|---|
| The game closes but Windows remains usable | Application, game file, driver, overlay, or software problem | Game logs and Reliability Monitor |
| A blue or black stop screen appears | Windows detected a system failure | Stop code and dump file |
| The PC instantly restarts | Hidden stop error, instability, hard reset, or abrupt power interruption | Event 41 fields and nearby events |
| The PC switches completely off | Power interruption, protection response, heat, or severe instability | Workload pattern, temperatures, and connections |
| The screen goes black, then the PC restarts | GPU path, Windows crash, or power event | Windows records and a repeatable workload |
| The display disappears but audio and the PC continue | Display connection, GPU driver, or display-output problem | Display and GPU troubleshooting |
Which Troubleshooting Path Should You Follow?
- Blue screen or automatic restart: Record the stop code and check Event Viewer.
- Instant restart or complete shutdown: Check Windows records, restore stock settings, inspect accessible power connections, and log temperatures.
- Only one game triggers the problem: Verify its files, remove mods, disable overlays, and compare another demanding game before blaming the hardware.
- The display disappears but the PC continues running: Investigate the monitor connection, GPU driver, graphics card, and display-output path.
- You notice an electrical smell, visible damage, smoke, or repeated power loss: Stop testing and disconnect the PC from mains power.
This article concentrates on whole-system restarts and shutdowns. If only the game closes, do not treat that as proof of a power problem. If the monitor loses signal but the PC stays responsive, that also requires a different diagnostic route.
Stop Testing If You See These Warning Signs
Do not keep launching the game until the machine finally stays on. Repeated hard shutdowns can cause data loss, corrupt files, and turn a useful symptom into a larger problem.
- Stop for a burning or sharp electrical smell.
- Stop for smoke, sparking, crackling, or new electrical buzzing.
- Stop if a GPU, motherboard, or PSU connector looks browned, melted, or deformed.
- Stop if temperatures rise rapidly toward the published limit for your exact component.
- Stop if the computer no longer restarts normally or repeatedly loses power during short checks.
Never open a PC power supply. Disconnecting it from the wall does not make its internal high-voltage components safe for an unqualified person to service. Also, never reuse modular PSU cables from another unit unless the manufacturer explicitly confirms compatibility between those exact models. A plug fitting into the socket does not prove that the wiring matches.
Check What Windows Recorded
Preserve the available evidence before changing drivers, BIOS settings, or hardware. Start with Event Viewer:
- Right-click Start and open Event Viewer.
- Open Windows Logs, then System.
- Look for a critical Kernel-Power, Event ID 41 entry matching the restart time. A sufficiently abrupt failure may leave incomplete information.
- Open the event, select Details, and use Friendly View to record the BugcheckCode, bug-check parameters, and PowerButtonTimestamp.
- Inspect the System events immediately before the shutdown time for WHEA, display-driver, thermal, storage, or volmgr records. An Event ID 6008 may also help confirm when the unexpected shutdown occurred.
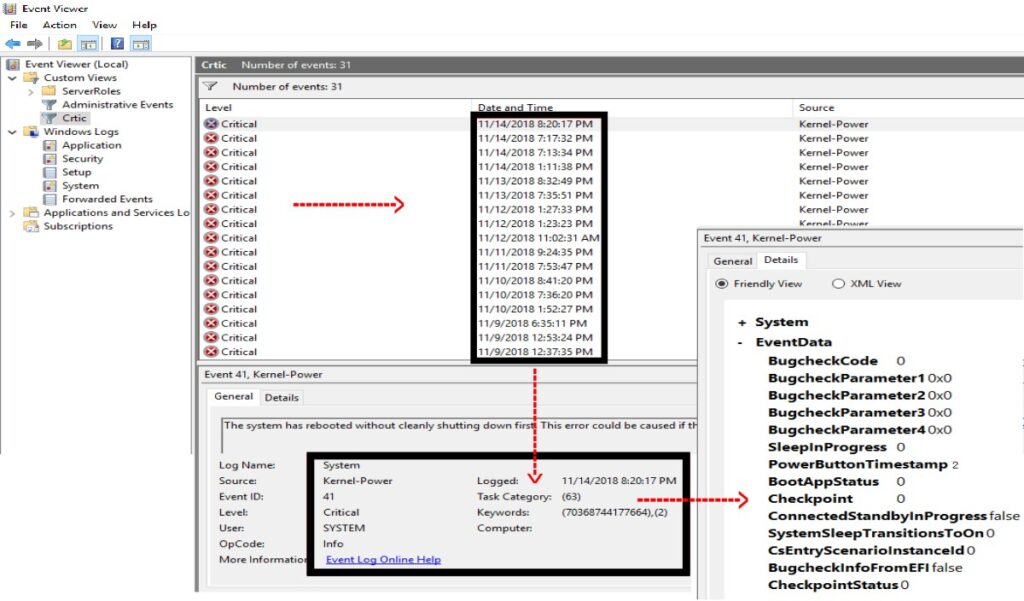
According to Microsoft’s Event 41 documentation, the event confirms that Windows did not shut down cleanly. It does not identify the cause by itself. Windows may have encountered a stop error, lost power too quickly to save an error, hard-frozen, or been switched off manually.
If Event 41 contains a bug-check code, Windows recorded a stop error. Microsoft stores that value in decimal in Event 41, while its bug-check reference commonly presents codes in hexadecimal. Convert and record the code before following guidance for that specific error.
If the bug-check fields are zero, do not write “bad PSU” in your notes. Abrupt power loss is one possibility, but Windows may also have frozen or failed to write a dump. A nearby volmgr Event 46 can indicate that crash-dump initialization failed. WHEA records are also useful evidence, but the word “WHEA” alone does not identify which part should be replaced.
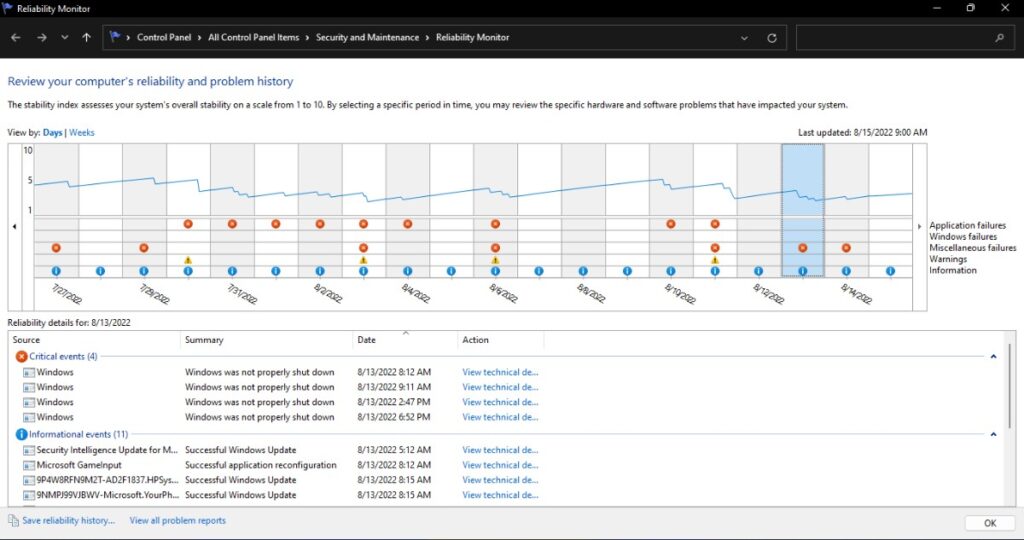
Open Reliability Monitor as a second view of the timeline. Search Windows for “reliability,” open View reliability history, and inspect the day and time of the restart. Select the relevant failure to view its technical details. A red failure marker helps establish timing, but an item appearing near the shutdown does not automatically make it the cause.
Reveal a Stop Error Hidden by Automatic Restart
Windows may reboot quickly enough that you never see its stop screen. Search for Advanced system settings, open the Advanced tab, select Settings under Startup and Recovery, and temporarily clear Automatically restart under System failure. If Windows encounters another stop error and remains able to display it, photograph the stop code and any named driver.
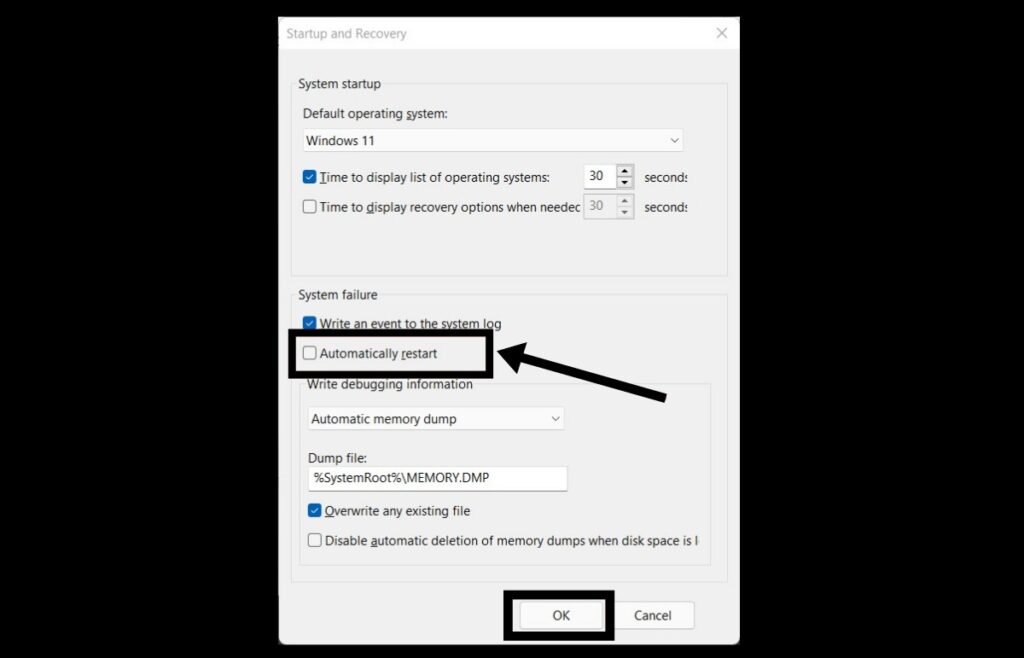
This setting cannot force an error code to appear after a true power interruption. If the PC still goes instantly dark or restarts without a stop screen, continue with the stability and power investigation. Once testing is complete, you can return to Startup and Recovery and re-enable automatic restarting if you prefer Windows to reboot automatically after a future stop error.
Return the PC to Stock Settings
Before blaming a physical component, test the PC in a known-stock configuration. Temporarily remove CPU and GPU overclocks, GPU undervolts, manual RAM timings, and automatic motherboard enhancement profiles. Disable XMP, EXPO, DOCP, or the equivalent memory profile for your board.
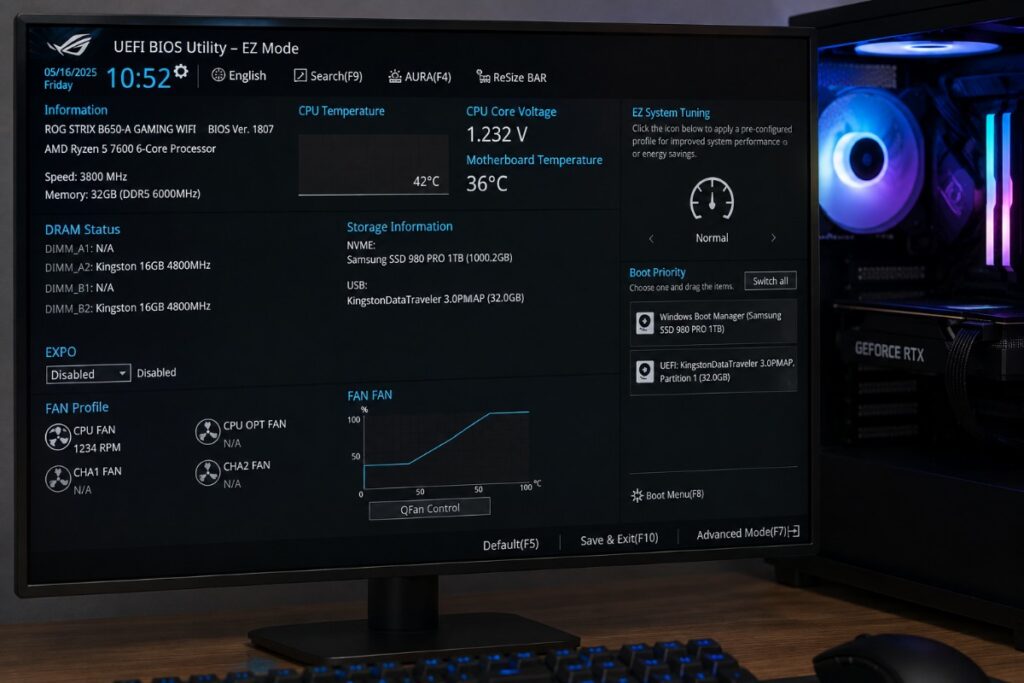
Record the original settings before changing them. Disable recognised tuning features individually where possible instead of immediately loading every BIOS default. A full BIOS reset may also change boot order, fan control, storage mode, security settings, or other options unrelated to the fault. If you are unsure what a setting controls, consult the manual for your exact motherboard or system.
An XMP or EXPO profile may be sold as a simple one-click setting, but it changes how the memory path operates. If disabling it stops the restarts, you have shown that the configured memory state contributed to the instability. You have not yet proved that a RAM stick is defective; the profile, memory controller, motherboard, BIOS, voltage, or module combination may be involved.
Write down anything that changed shortly before the fault began: a new GPU, CPU, RAM kit, PSU, driver, Windows update, BIOS update, or cable change. Then rerun the same game at the same settings and in the same repeatable area. Change one variable at a time so that a successful test actually tells you something.
| Test | Configuration | Result to record | What changed |
|---|---|---|---|
| Original failure | Settings used when the restart occurred | Time, symptom, and triggering action | Baseline |
| Stock retest | CPU, GPU, and RAM tuning disabled | Stable or failed under the same workload | Tuning removed |
| Single-variable retest | Only one setting restored | Stable or failed under the same workload | Only the named setting |
Inspect Cooling and Power Connections
Shut the PC down, switch the PSU off, disconnect mains power, and let the system sit before checking accessible components. Confirm that the CPU cooler is secure, the fans can spin freely, and dust is not blocking the cooler or case intakes. Inspect the accessible motherboard, CPU, and GPU power plugs for looseness, discoloration, melting, or other visible damage.
Do not dismantle the PSU or force a connector into place. If you are not comfortable identifying and reconnecting internal power cables correctly, stop at the visual inspection and ask an experienced technician for help.
Use the cable arrangement specified for your exact GPU and PSU. Do not copy a universal cabling rule from a forum photograph, and do not move modular cables between PSU models without confirmed compatibility. The connectors may fit while using a different internal wiring arrangement.
If the visible inspection finds no warning signs, log the original gaming workload. Use HWiNFO to record CPU temperature, GPU core temperature, GPU hotspot where available, clocks, fan speed, and exposed throttling or limit indicators. Our HWiNFO64 guide explains the sensor window and CSV logging without making you stare at hundreds of irrelevant readings.
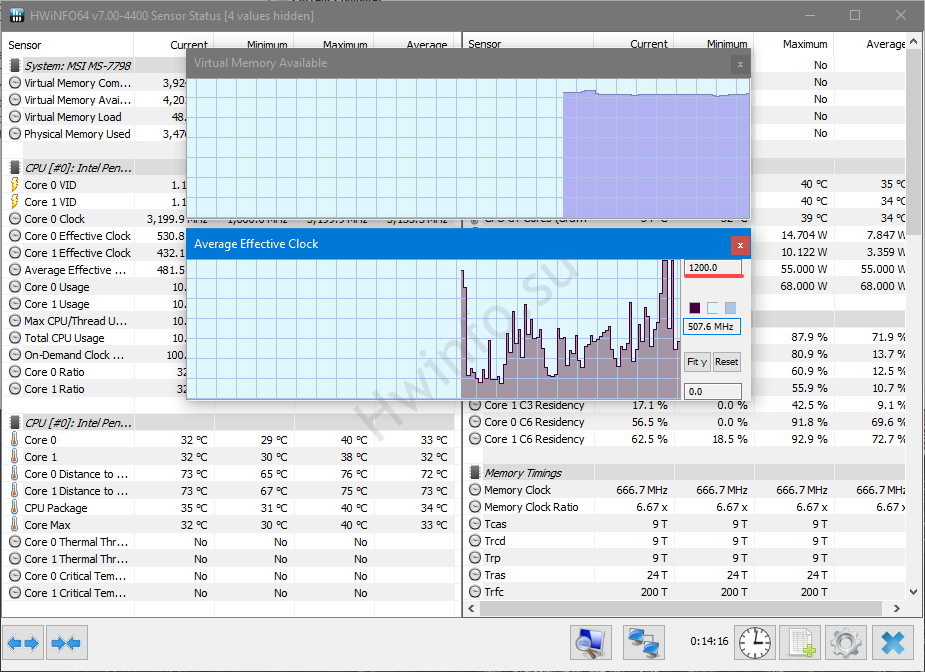
A sudden power loss may prevent the final sensor readings from being saved, so an incomplete log does not rule out a temperature or power problem. Treat the log as evidence rather than proof that every reading immediately before the failure was captured.
Do not use one universal “safe temperature” taken from a different processor or graphics card. Check the published limit for your exact hardware. A normal GPU-core reading also does not eliminate every heat problem: the CPU, GPU hotspot, graphics memory, motherboard power delivery, or another poorly cooled component may behave differently. Our guide to hidden thermal and power throttling explains why one reassuring number can miss the real limit.
Test CPU, GPU, and Memory Separately
If there are no danger signs and the stock-settings retest still fails, isolate the workload. Start logging before every run, begin with short individual tests, and monitor temperatures continuously. The starting times below are intended to reproduce an obvious failure without subjecting an unstable PC to unnecessarily long tests. Passing them does not certify that the system is fully stable. Our guide to safe and repeatable PC testing covers the setup in more detail.
| Test | Beginner-safe starting point | Stop immediately if | What to record |
|---|---|---|---|
| Original game | Repeat the same scene or action for 10–15 minutes | The original fault returns, temperatures approach the component’s published limit, or new warning signs appear | Time, symptom, game area, and settings |
| CPU-only load | Run a CPU test at its default settings for up to 10 minutes | Errors appear, the PC freezes or restarts, or CPU temperature rises toward its published limit | Errors, temperature, clocks, and time of failure |
| GPU-only load | Run a 3D or GPU test at its default settings for up to 10 minutes | Errors, severe visual corruption, a freeze, restart, shutdown, or excessive temperature occurs | Errors, GPU temperature, hotspot, clocks, and time of failure |
| Memory | Run OCCT’s memory test at default settings or Windows Memory Diagnostic | The tool reports an error or the system becomes unstable | Error count, memory profile, module arrangement, and time |
| Combined load | Only after individual tests remain safe; begin with no more than 5 minutes | Any error, warning sign, excessive temperature, freeze, restart, or shutdown occurs | Whether the system fails only when CPU and GPU load rise together |
OCCT provides separate CPU, memory, GPU, VRAM, and combined power workloads. This makes it useful for isolation, but its results still require interpretation. A test failure identifies a repeatable condition; it does not automatically name the defective part.
Do not increase test intensity, voltage, power limits, or temperature limits while diagnosing the fault. Run the tests at default settings and stop after the first repeatable failure. The objective is to identify which type of load triggers the problem, not to push unstable hardware as hard as possible.
| Failure pattern | What it increases suspicion of | What to do next | What it does not prove |
|---|---|---|---|
| Only one game fails | Game, driver, overlay, mod, or software conflict | Verify files, remove mods and overlays, check known issues, and compare another game | All hardware is healthy |
| CPU-only load fails | CPU settings, cooling, memory controller, motherboard, or power path | Confirm CPU defaults and cooling, then retest memory at stock settings | The CPU is defective |
| GPU-only load fails | GPU, driver, connector, cooling, or GPU power path | Confirm GPU defaults and connections, then compare drivers and more than one game | The GPU is defective |
| Memory test reports errors | Unstable DIMM, slot, controller, BIOS, or memory configuration | Disable XMP or EXPO and retest supported module and slot configurations | One specific stick is defective |
| Only combined load fails | Total power delivery, shared heat, or platform instability | Stop repeating the combined test and investigate PSU suitability, cabling, temperatures, and motherboard stability | The PSU is defective |
| Synthetic tests pass | A game-specific or intermittent condition remains possible | Return to the original game and compare its drivers, settings, mods, and overlays | The system is fully stable |
Do not keep increasing test duration after a hard shutdown. A successful test reduces suspicion; it does not certify the component. A shutdown during a combined power test increases suspicion around power delivery, but heat, motherboard instability, and another shared dependency remain possible.
Follow the Evidence to the Right Fix
Stable After Removing an Overclock or Memory Profile
Leave the system at stock settings until it survives the original game and the relevant individual tests. If you want to restore tuning, reintroduce only one change at a time. Stability at stock means the removed configuration contributed to the problem; it does not automatically condemn the hardware.
Temperature or Throttling Evidence
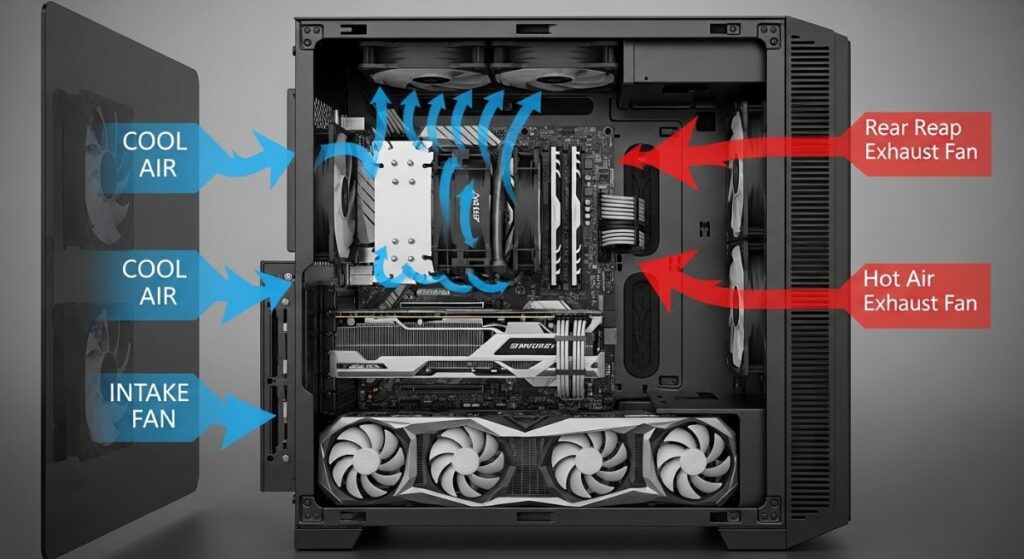
Clear obstructed airflow, confirm fan operation, and check cooler mounting before buying anything. Remove the CPU cooler only when the evidence justifies disturbing it. If removal is necessary, follow our guide to applying CPU thermal paste correctly, then repeat the same monitored workload.
Memory Errors or XMP/EXPO Instability
Retest at the motherboard’s default memory settings. If errors continue, test only supported module and slot configurations, following the motherboard manual. Repeatable errors prove instability in the tested memory path, not automatically a dead DIMM. Replacement becomes reasonable only after the evidence isolates the kit or a compatible known-good kit removes the problem. At that point, use the RAM buying guide to choose a compatible replacement.
GPU-Side Failure
Keep the GPU at stock settings, recheck its power connection, and compare more than one game. If the failures began with a driver change, test an appropriate driver rollback. If the driver installation may be damaged, use the GPU vendor’s current clean-install procedure. Another game passing lowers suspicion of a universal hardware failure, but it does not clear the system because different games stress the GPU, CPU, memory, and drivers differently.
A compatible known-good GPU in the same PC—or the suspected GPU in another compatible PC—provides stronger evidence than repeatedly reinstalling drivers. Attempt this only if you are comfortable replacing the card and connecting its power cables correctly.
Power-Delivery Suspicion
Record the exact PSU model, age, cable arrangement, and any recent CPU or GPU upgrade. Check the component manufacturers’ power and connector requirements. Do not judge the PSU by advertised wattage, efficiency certification, age, or software voltage readings alone.

If the PC fails only when total load rises, has no recorded bug check, and all accessible connections and stock settings have been checked, the PSU becomes a stronger suspect. The best practical home confirmation is a suitable known-good PSU installed with all of its own correct cables. Attempt this only if you can identify and reconnect every required power cable correctly. Otherwise, ask a qualified technician to perform the substitution. Never open the suspected unit.
Replacing the PSU first may appear faster, but the same symptom can come from unstable memory, GPU power connections, overheating, drivers, or motherboard faults. A blind replacement costs money and can introduce new cabling mistakes. Substitute the PSU early only when the evidence already points toward power delivery and the replacement unit is suitable for the system.
Only One Game Triggers the Restart
Verify the game files, remove mods, disable overlays, and check the developer’s known-issue reports. Compare another demanding game and another graphics API where the game supports it. A second game passing does not completely clear the hardware because different games create different workloads. However, a game-specific trigger makes wiping Windows or buying a PSU an unjustified first response.
When Replacing a Part Is Actually Justified
Replacement should follow diagnosis, not fear. Look for multiple pieces of evidence pointing in the same direction rather than relying on one dramatic symptom.
| Replacement is reasonable | Do not replace it yet |
|---|---|
| The component, connector, or matching cable has confirmed physical damage | Event 41 appears without supporting evidence |
| A repeatable failure has been isolated to one subsystem | One black screen, restart, or shutdown occurred |
| A manufacturer-supported diagnostic repeatedly reports a failure | One combined stress test shut the PC down |
| A suitable known-good substitute removes the repeatable fault | The PSU is old or has a lower efficiency rating |
| The component repeats the fault in another compatible system | A monitoring app reports a questionable voltage |
| A qualified technician confirms the failure | A forum user experienced a similar symptom |
Physical damage may involve more than one replaceable item. A melted GPU power connector, for example, requires inspection of the connector, cable, graphics card, and PSU-side connection rather than automatic replacement of only one part.
If a suitable known-good PSU and its own cables remove a repeatable combined-load shutdown, replacing the original PSU becomes reasonable. If memory passes at default settings while one specific XMP or EXPO profile repeatedly fails, the answer may be a safer memory configuration rather than new RAM. If the evidence still points in several directions, do not buy a random component and assume that it will solve the problem.
When to Stop and Get Professional Help
Home diagnosis reaches its limit when confirmation requires electrical equipment, compatible spare parts, internal laptop work, or skills you do not have. Stop testing and arrange qualified help when:
- You find physical damage, melted connectors, smoke, sparking, or an electrical smell.
- The PC repeatedly powers off during basic, short tests.
- The evidence points toward the motherboard but does not isolate the fault.
- The machine uses proprietary OEM power hardware or non-standard connectors.
- A laptop would require internal disassembly.
- You cannot obtain a suitable known-good component for substitution.
- You are not comfortable replacing internal components or identifying their power cables correctly.
- Important data is at risk or the system no longer boots reliably.
Take your Event Viewer details, Reliability Monitor timeline, complete hardware list, stock-settings result, temperature log, and test record with you. “It restarts in games” gives a technician a symptom. A record showing exactly which workload fails, which changes affect it, and what Windows captured gives them a useful starting point.
How to Interpret Your Final Result
This process should leave you with one of three honest results:
- Cause isolated: One specific correction consistently removes the repeatable failure. Apply that correction and verify it with the original gaming workload.
- Subsystem strongly suspected: Several results point toward the same subsystem, but the exact component has not been confirmed. Use a suitable known-good substitute or qualified testing before buying a replacement.
- Evidence remains inconclusive: The results still point in several directions or the failure cannot be reproduced safely. Stop replacing parts blindly and escalate with the records you collected.
Passing a few short tests is encouraging, but it does not prove that the problem has disappeared. Confirm the result with the original game, settings, and repeatable scene that triggered the failure. If the PC remains stable across repeated gaming sessions, you have stronger evidence that the correction worked.
The goal is not to guess the most common culprit. Make the failure repeatable when it is safe to do so, change one condition, and check whether the result changes. That is how you isolate the real cause—or recognise when home diagnosis has reached its limit.
If the PC proves stable but you want to inspect its general condition before upgrading, continue with the complete gaming PC health check.